In this new series, Chartered Surveyor Ian Rock FRICS – Author of the Haynes Home insulation Manual – explains how to cut your energy bills by boosting your home’s thermal efficiency.
PART FOUR:
CWI – Cavity Wall Insulation
is it as good as it’s cracked up to be?
Everyone knows that Cavity Wall Insulation (CWI) is a ‘Good Thing’. Except of course when it isn’t. The industry doesn’t go out of its way to point out that large numbers of properties are unsuited to CWI, nor does it highlight the potential risks involved in filling cavities.
Nonetheless there’s no doubt that, in homes where it’s an appropriate treatment, CWI is one of the most cost-effective of all energy saving measures. A typical installation costs as little as £300 with the investment being rapidly paid back from savings in fuel bills in 2 or 3 years. About 19 million homes in the UK have cavity walls, and government figures show that around 60 per cent have CWI. Which means more than 7m such homes currently remain un-insulated.
To see if your home is a potential candidate, the obvious first question to ask is whether it has cavity walls. If instead it’s got traditional solid walls (mostly pre-1930s) then you might want to skip forward to the next instalment of this blog. Cavity walls comprise two separate thin walls (known as ‘leaves’ or ‘skins’) usually of brick or blockwork with a gap in between. All the bricks are laid lengthways in ‘stretcher bond’ and the inner and outer leaves are held together using metal wall ties.
PROS and CONS
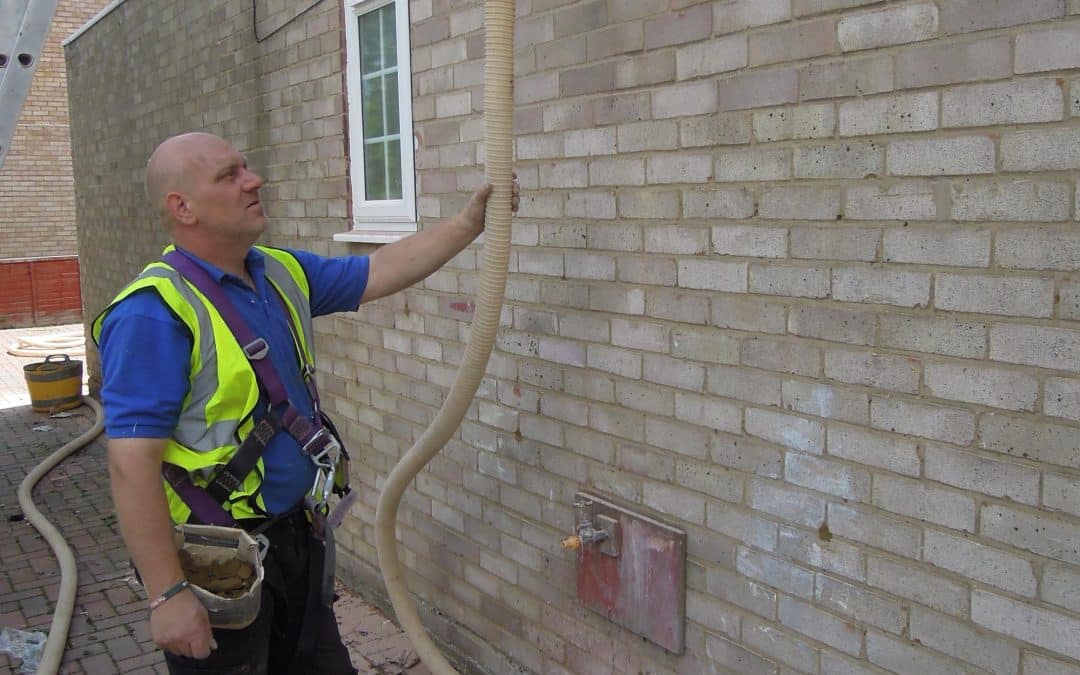
Filling the space inside your walls can reduce heat loss by a whopping 40 per cent, with dramatic savings in heating bills. As well as being relatively inexpensive, this type of insulation has the further advantage of requiring zero maintenance. And because the material is pumped into the cavity through the outer leaf, the job can be done almost without the occupants knowing.
Detractors point to the fact that cavities are rarely wide enough to achieve a sufficient thickness of insulation for exceptionally good thermal performance. But probably the biggest area of concern is the potential for damp to bridge across filled cavities. Once full of insulation there is an increased risk of moisture from rain penetration transferring across to the inner leaf.
This can result in areas of dampness forming on internal finishes. More worryingly, wet insulation is worse than no insulation at all, potentially drawing heat out of the house. There is also some debate about the related subject of whether filling cavities hastens rusting in wall ties. But these risks very much depend on the severity of the weather in a particular location, and the condition of the external wall – both factors that installers should check prior to installation.
Other reported problems are largely down to poor workmanship, such as selecting the wrong choice of insulation materials for the location. Over-enthusiastic installers have been known to block flues or airbricks and blow insulation out the tops of walls into lofts, or even into adjoining properties. Unfilled pockets of air left inside the insulation can form ‘cold spots’ on the inside walls which then attract condensation patches and black mould. Similarly, where the insulation settles over time it can leave large un-insulated areas at the top of walls.
* Is it suitable for cavity insulation?
Just because a building has walls with a handy space in the middle, doesn’t automatically make it suitable for filling. Notable exceptions include:-
* Older walls with a cavity width less than 50mm
* High buildings with walls taller than 12 metres (about 4 storeys).
* Unfill-able areas: In many houses with cavity walls, there are some areas of incompatible solid or timber stud construction, eg large decorative wall panels around windows or tile hung bays
* PRC & steel frame Many post war Council houses were built with walls of pre- reinforced concrete (PRC) or steel frames, and are better suited to having the walls clad externally or else lined internally.
* Buildings with poor access Contractors may refuse to carry out works where access the walls is difficult, eg some homes with conservatories, attached garages or lean-to extensions.
* Modern timber frame buildings Timber frame buildings have cavity walls with the load-bearing inner leaf constructed of insulated timber panel construction, rather than masonry. These cavities must not be insulated because a ventilated cavity is essential for removing any moisture. But the outer masonry walls to timber frame buildings appear identical to conventional brick & block. To spot the difference you need to look up in the loft, where the gable and party walls are of timber panels, rather than brick or blockwork.
* A choice of materials
The most common types of insulation materials used for pumping into cavities are mineral fibre wool, polystyrene beads, and polyurethane foams.
Blown mineral wool fibre
Probably the most commonly used material, with few reported problems. Similar to mineral quilt insulation used in lofts but taking the form of small tufts that can be blown down a hose into walls. Some types made from recycled glass have a soft texture similar to cotton wool. However, although the material is water-repellent, it only has to become slightly damp to lose its insulation properties. Mineral fibre can also be prone to settling over time within the cavity, leaving cold voids at the top of the house.
Beads and granules
Popular with mainstream housebuilders, expanded polystyrene (EPS) beads and granules provide good insulation qualities and are effective at achieving consistent gap-free coverage within cavities. Beads made from polyurethane (PUR) offer even better thermal performance. To limit the risk of escape through cracks and openings, specially bonded beads are coated with adhesive just prior to being injected into the wall. In some cases insufficient bonding on site has allowed loose beads to escape through airbricks or to pour out of walls when later alterations were carried out involving cutting into walls. And although beads and granules are waterproof, there are reported cases where incomplete filling has left voids that allowed water to track across the cavity.
Foam insulation
The thermal insulation value of polyurethane (PUR) is amongst the best available. The foam expands in the cavity before setting into a closed-celled rigid material, strongly adhering to both leaves, bonding them together. The foam seals all gaps and moulds itself to wall contours as well as creating its own vapour control layer. Polyurethane foam consists of liquid ingredients mixed together and injected via 12mm diameter holes. But a successful outcome is particularly dependent on good quality control on site.
Urea-formaldehyde (UF) is a similar type of foam that consists of a resin and hardener solution injected with compressed air into the cavity. After injection, the foam hardens and shrinks slightly as it dries, with a certain amount of thin spidery cracking or ‘fissuring’ developing. Some older installations have degraded over time becoming cracked and powdery.
The installation process
Cavity wall insulation is a specialist job normally carried out by an approved installer (registered by either BBA or BSI). Upon completion of the work they will arrange for The Cavity Insulation Guarantee Agency to issue a ‘CIGA’ guarantee covering defects in materials and workmanship over a 25 year period. The warranty should still apply should the contractor go bust in the meantime.
1/ Checking the suitability of walls
There are 3 key parts of the building that must be surveyed prior to installation work:-
* The outer wall surface should be free from defects such as any damp, significant cracking, or eroded pointing/masonry. Wall heights must be assessed in relation to their exposure to wind-driven rain and the correct type of fill selected. Any leaking gutters, pipes or worn sills etc that could cause damp penetration to the walls must be repaired.
* Internally the walls should be free from damp. Any visible gaps to the inner leaf should be sealed so the insulation doesn’t seep into the house. Any service pipes and cables, ventilation ducts, airbricks and flues will need to be sleeved through both leaves of the wall.
* The cavities must be confirmed as clear of obstructions and at least 50mm wide to be eligible for a CIGA guarantee. This usually involves peering into the cavity with the aid of a boroscope.
2/ Injecting the walls
Most CWI installation firms should be able to self-certify for Building Regulations compliance as ‘competent persons’. The work is done entirely from the outside.
Starting about 900mm above the damp proof course (DPC), injection holes are drilled through mortar joints in a domino pattern. To prevent the fill entering the adjacent properties cavity barriers need to be installed. The insulation is pumped into the wall working upwards from the bottom, with periodic checks during installation to ensure the wall is filling up evenly and that no gaps are left in the insulation between injection points. Finally, the injection holes are made good with mortar.
3/ Post completion checks
Soon after completion, CIGA should issue a guarantee and the installer should provide confirmation of compliance with Building Regulations. Spot checks are carried by some local authorities and CIGA. Increasingly thermal imaging cameras are used for quality control to highlight any gaps in the insulation.
NEXT MONTH: Why ‘gift wrapping’ your home on the outside is technically the most effective way to minimise heat loss (whilst sprucing up your walls)
Ian Rock’s home insulation tips are taken from the new Haynes Home Insulation Manual. For further information see www.home-insulating.com
Check out our Rightsurvey blog pages for more industry tips and secrets written by property professionals to help put you in control.

