In this new series, Chartered Surveyor Ian Rock FRICS – Author of the Haynes Home insulation Manual – explains how to cut your energy bills by boosting your home’s thermal efficiency.
PART FIVE:
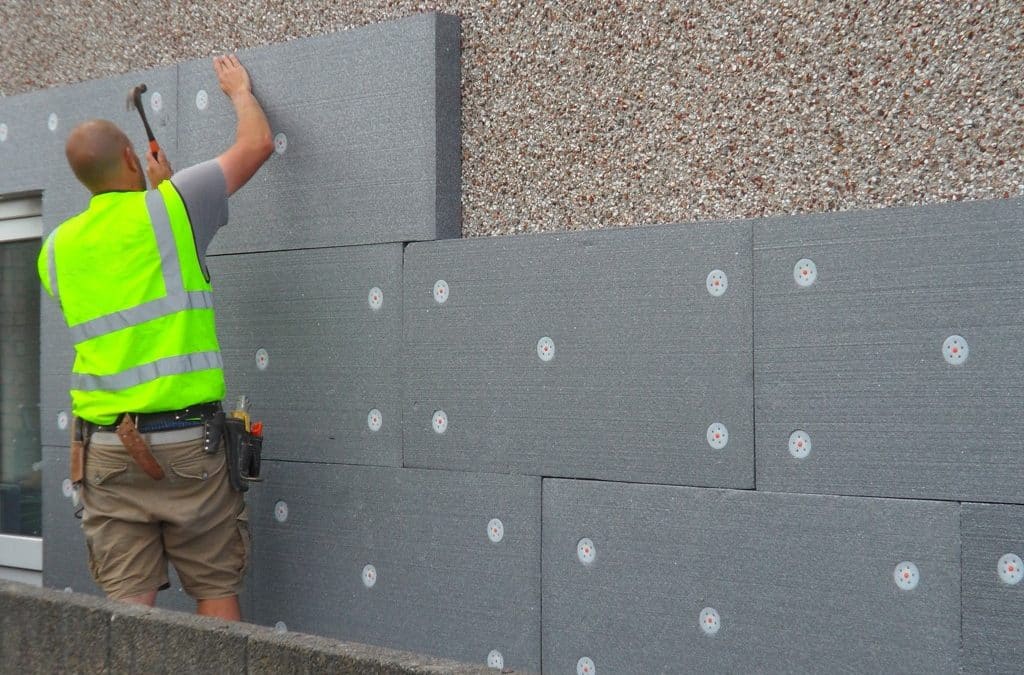
EWI – External Wall Insulation
Is cladding the outside of your house a realistic solution to heat loss?
‘Gift wrapping’ the outside of your home in a thick coat of insulation is one of the best ways to boost its thermal performance.
Cladding the walls externally can be particularly useful for some older solid wall buildings that don’t have a handy cavity to squirt insulation into.
But it can also be very effective for some buildings with cavity walls that aren’t suitable for filling, e.g. where the cavities are too narrow, and for timber frame houses and some high-rise flats.
But as with all methods of insulating there are pros and cons:-

PROS
* Minimal risk of ‘cold spots’ that cause condensation and mould because EWI can be applied as a continuous covering without gaps. Unlike lining the walls internally, the insulation doesn’t get interrupted at partition walls and floor junctions.
* Excellent draught-proofing and air-tightness, also thanks to the coverage being continuous.
* Relatively little disruption to occupants during installation (although some services may need to be temporarily cut off and re-connected).
* No loss of floor space internally to rooms.
* Spruces up the exterior of bland looking buildings and can transform shabby exteriors, e.g. giving unloved tower blocks a new lease of life.
* A new exterior finish means minimal future maintenance.
CONS
* Unsuitable for most period properties where cladding the walls on the outside would obliterate charming historic features or wreck ‘kerb appeal’. Inappropriate for Listed buildings and those located in Conservation Areas (but may be suitable to some rear elevations). Can also prevent old solid walls from ‘breathing’, potentially setting up damp problems.
* Unsuitable for many terraced or semi-detached houses where it’s likely to clash with adjoining facades.
* Requires tricky modifications at roof level and to window and door openings. Rainwater downpipes need to be removed and re-fixed, along with external lights, pipes, cables, satellite dishes etc.
* EWI is normally by far the most expensive option because of the need for scaffolding (although unit costs can be reduced where a whole terrace or a complete block of flats is treated at the same time).
* Not usually suitable for DIY application
Picking the right system
There are 3 main types of external wall insulation – wet render finishes, dry cladding systems, and bespoke designs. However, all systems consist of 3 key components – a layer of insulation, some method of securing it in place, and a protective finish.
Wet render systems
Wet render systems are the most widely used type of EWI. A typical installation might comprise a horizontal base track screwed to the wall just above DPC level to support thick rigid polyurethane insulation boards which are further secured by gluing in place and/or by inserting special insulated anchor fixings.
Once the insulation has been fitted to the wall, a protective render finish can be applied. This is built up in 2 or 3 coats over a reinforcing mesh (glass fibre, plastic or metal). Synthetic polymer modified systems have exceptional strength despite being only 10 to 15mm thick. The final decorative coat might take the form of a through-coloured finish such as acrylic or silicone, or the top coat of render could be scored to give the appearance of brickwork.
Dry cladding systems
Traditionally dry cladding was applied to walls in the form of tile hanging or weatherboarding fixed to timber battens. Modern variations comprise purpose-made panels or boards installed over thick layers of high-performance insulation. Alternatively, special thin panels of moulded fake brickwork (known as ‘brick slips’) can be fixed in place with adhesive, and once pointed up can looking surprisingly realistic. However, dry cladding systems are relatively expensive making them generally uneconomic for use on mainstream housing, but are widely used for large projects such as high-rise dwellings.
Bespoke systems
Custom-made EWI systems can be designed by architects for individual projects. For example a traditional oak weatherboarding ‘rainscreen’ could be fastened to a masonry wall via a simple timber-framework to form a ventilated cavity. But a wide variety of possible finishes can be used, including stone, glass, terracotta and tile hanging.
Bespoke systems are particularly important for historic buildings where radically altering their appearance isn’t usually acceptable. For example where a building has a traditional tile-hung or timber weatherboard clad façade, it can sometimes be possible to install new insulation concealed behind the original cladding, which is later re-instated. To retain the necessary ‘breathability’ for old solid-walled buildings natural materials are preferable, such as hemp-lime composites, or wood-fibre boards, although mineral wool quilt is also breathable.
Installation – getting the detailing right
When it comes to installing EWI, the devil is in the detailing. The need for accuracy combined with the cost of scaffolding and working at height means it’s normally advisable to appoint an approved installer. Firms qualified to carry out EWI work and issue the necessary warranty are registered with ‘INCA’ (the Insulated Render and Cladding Association).
As well as selecting the optimum insulation for your property, it’s obviously of prime importance to ensure that once fitted it’s 100% secure. So a ‘belt & braces’ approach is widely adopted, combining adhesive ‘chemical anchors’ with mechanical fixings, such as a supporting framework of tracks and the inserting of special anchor bolts. Fixings need to be corrosion-proof, resistant to cold bridging, and the whole system needs to be able to accommodate a certain amount of movement to the building.
One of the key challenges when installing EWI is getting the detailing right at junctions. Tricky areas include:-
Eaves and verges
Roofs are built with an overhang at the tops of the walls to provide protection from the weather as well as to ‘look right’. So making the walls 100mm or so thicker can cause problems at the eaves under the roof overhang. If you’re having any roof work done in advance it can be an ideal opportunity to modify the roof by extending the rafters at the eaves and gable ends in preparation for later EWI installation. Alternatively you could leave the roof as it is and simply cover the uppermost edge of the insulation boards with special cappings. But this protruding ‘shelf’ near the top of the walls can look a bit odd and may not suit some properties. A good compromise can be to fit specially designed super-wide gutters that cover the top edge of the insulation at the eaves and verges, replacing the existing guttering.
Downpipes
Rainwater downpipes will need to be disconnected and re-fitted at a revised angle so they connect with the guttering at the top and gullies at the base.
Junctions at window and door openings
To reduce the risk of thermal bridging you need to continue insulation around the corners at the reveals to window and door openings. The trouble is, space here can be very limited. One solution is use thinner, high-performance materials such as aerogel or vacuum panels to line the reveals.
It’s also important that window sills project clear of external wall surfaces so that rainwater is dispersed well away from the building. But making the walls substantially fatter will mean the sills will need to be extended.
Lower walls
When fitting insulation to the lower walls, below DPC level, it’s important not to bridge the DPC as this can allow damp to enter the wall.
Services
Older properties tend to have externally-run waste pipes leading to a large vertical soil & vent pipe serving the bathroom and kitchen. There may also be assorted extractor vents, air grilles, boiler flues, satellite dishes, telecoms boxes and cable runs to accommodate. These will all need to be temporarily removed and re-fixed.
NEXT MONTH: Redecoration with a twist: how lining your main walls on the inside can be a realistic DIY project – achieving impressive results on a budget.
Ian Rock’s home insulation tips are taken from the new Haynes Home Insulation Manual. For further information see www.home-insulating.com