In this new series, Chartered Surveyor Ian Rock FRICS – Author of the Haynes Home insulation Manual – explains how to cut your energy bills by boosting your home’s thermal efficiency.
14
Insulating Doors
Why your entrances and exits may be topping the heat loss charts!
In a typical home the doors are responsible for leaking in total around 10% of all the heat lost from the building. Yet this is one part of the building that often gets overlooked when it comes to improving thermal performance.
Doors are a particular weak point when it comes to draughts blowing into the home; as well as gaps around poorly sealed frames and thresholds, letterboxes and keyholes can provide easy access for unwelcome gusts of cold air.
The options for boosting the thermal efficiency of doors are broadly the same as for windows – you can either retain and overhaul the existing door and frame, or replace just the door, or completely replace the whole thing with a combined new door and frame.
As you might expect, complete replacement tends to be the most effective option. But this may not always be appropriate, particularly for period properties where original features are best retained as they are very much part of the building’s history and character, and enhance market value. In some cases there may be planning restrictions that prevent replacement. So with Listed buildings and those in Conservation Areas, upgrading the originals is normally the best bet.
Whichever option you choose, the issue of ‘cold bridging’ around the frame will need to be tackled. The reveals can be upgraded in a similar way to windows. But with doors there is the additional challenge of achieving an effective seal underneath at the threshold.
Thermal bridging
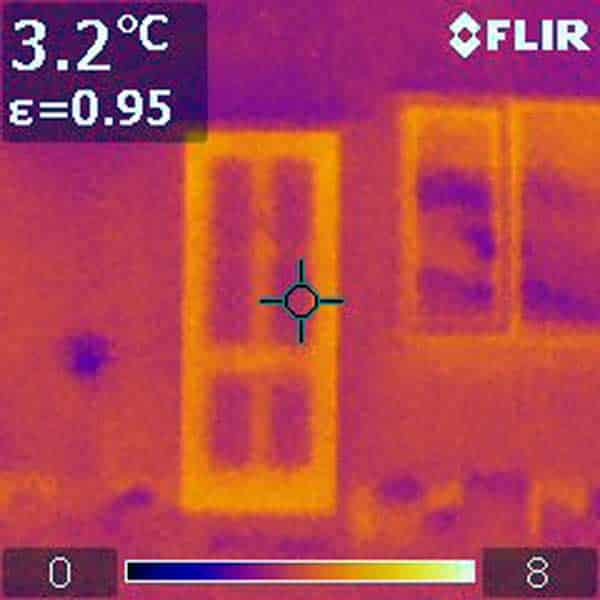
Even with new high performance doors installed, there is normally still a risk of excessive heat loss around the edges of the openings – at the heads, sills and reveals. In most properties there will be virtually zero insulation at these points, with a consequent ‘cold bridging’ allowing cold from outside to invisibly seep into the building and, conversely, channelling warmth out of the rooms.
To make matters worse, lintels are commonly made of cold steel or concrete, and until quite recently in new construction reveals were simply ‘closed off’ around openings using brick or blockwork.
The good news is, significant improvements can be made. To remove existing door frames requires hacking out plasterwork around the reveals. Where the cavity is exposed, the open end should be sealed (as in new construction) by squashing a strip of insulated ‘cavity closer’ material into the end. Then once the new units are in place, with the reveals insulated with an airtight surface, it should significantly reduce the extent of cold surfaces, and hence thermal bridging and condensation.
To ensure junctions between new frames and and surrounding masonry are air-tight they can be sealed using expanding foam and special tapes.
Draught-proofing
Doors tend to be more draughty than windows, often having sizeable gaps to thresholds and frames alike. The combined area of all the gaps and holes in a typical front door is roughly equivalent to a gaping 5 inch square hole. So there’s a lot that can be done to block this source of cold air and heat loss, starting with sealing the gaps around the frame.
If you have a porch or conservatory you’re off to a head start since they can acts as an ‘air-lock’, helping to reduce cold draughts. A range of specialist seals are available for draught-proofing doors, as these often need to withstand much more intensive use than windows.
TOP TIPS
* Before draught-proofing, first repair any damage to doors
* Seal any gaps internally and externally with silicone mastic at junctions between the frames and wall reveals and to window ledges etc.
* Replace any defective closing mechanisms
* Ensure letterboxes seal shut and cover exposed key holes.
Upgrading existing doors
It’s not uncommon to find that old doors have warped. In most cases applying a flexible sealant or draught-stripping can accommodate irregularities. With timber doors it’s also normally possible to make small adjustments with careful planing.
Effective locks and catches can help doors close firmly so that seals are compressed. Key holes can be closed with escutcheons, and letterboxes can be sealed so they close firmly, fitted with draughtproof brushes, or a small receptor box constructed on the inside. The traditional method of drawing thick curtains across doors can also be surprisingly effective.
To reduce heat losses it’s often possible to fit new timber panelling to the inner face over the existing door, creating a new appearance. A more effective approach is to glue sheets of rigid insulation board over the thinner panelled areas concealed within a plywood sheet finish. Glazed areas can be over-clad with secondary glazing and the doorframe draught-proofed.
Fitting new doors
Where both the door and frame are being replaced simultaneously, they are defined in the Building Regulations as ‘controlled fittings’. Replacement doors are required to provide a U-value of 1.4 W/m2K or better for the whole door, or a minimum WER rating of B. This requires insulated cores, and any glazed areas to contain high performance double glazing.
Some new doors can achieve as high a thermal performance as windows by incorporating triple-glazed lights, pre-insulated cores and double seals.
NEXT MONTH: How much energy are you losing every day through unlagged pipework and water tanks?
Ian Rock’s home insulation tips are taken from the new Haynes Home Insulation Manual. For further information see www.home-insulating.com