In this new series, Chartered Surveyor Ian Rock FRICS – Author of the Haynes Home insulation Manual – explains how to cut your energy bills by boosting your home’s thermal efficiency.
PART NINE:
How To Insulate Flat Roofs
…..and stem heat loss from some of the coldest rooms in your home
A lot of houses have flat-roofed extensions, or small flat roofs to things like porches, bay windows and dormer windows.
Trouble is, most flat roofs only have a meagre amount of insulation; in fact many were built completely naked in insulation terms. If you looked at a thermal-imaging photo of your flat roof, the chances are it would reveal astounding levels of heat leakage, with lots of expensively-generated warmth from the rooms below billowing skywards.
So this is one part of the building where boosting the level of insulatingreally can reap major dividends in reduced energy bills.
* Coverings
Unfortunately, dire thermal performance isn’t the only ailment that roofs of this type commonly suffer from.
The reason why flat roofs have gained a certain degree of notoriety amongst surveyors is primarily down to their short-life coverings. Mineral felt is the most widely used covering material on account of its relatively low cost and ease of installation. It is made from bitumen-coated fabric, usually laid in layers bedded in hot bitumen. But with a lifespan of only 10 to 15 years, in many properties re-covering is likely to be overdue (although longevity was traditionally improved by solar reflective coatings such as stone chippings).
So if the time has come for re-covering a flat roof, it’s an excellent opportunity to beef up the insulation at the same time. In fact it’s not always appreciated that you have a legal obligation to do just this; the Building Regulations now require that the insulation to any ‘thermal element’ of your house (including flat roofs) must be upgraded to current standards when any repair or refurbishment work is carried out.
However not all flat roof coverings are short-life materials. Metal sheet, normally lead or zinc, is one the most durable forms of protection and was widely used on older roofs.
Sadly, today, the cost of fitting new metal sheeting can make it uneconomic for re-cladding all but the smallest roofs, so other materials with superior performance to cheaper roofing felts, such as bituminous coatings, fibreglass and EPDM synthetic rubber may be worth considering. But as a rule, original leadwork should be replaced with matching new materials.
* Choosing insulation
There are 3 main types of insulation suitable for flat roofs:-
Soft fibre quilt or loose-fill materials
Mineral wool quilts, sheepswool and loosefill cellulose are popular materials for laying above ceilings, both in lofts and to flat roofs. However, being ‘floppy’ they can’t support their own weight, and are therefore best suited to being laid loose with nothing over them. Loose-fill materials can be very effective for filling awkward voids.
Semi-rigid insulation batts
Batts of mineral wool, sheepswool or woodfibre etc are rigid enough to support their own weight without slumping. This makes them useful for wedging in place between joists.
Rigid boards
Large rigid insulation boards (e.g. polyurethane foam or polystyrene) are highly resilient and durable, making them well suited for laying on top of flat decks. Alternatively, strips of insulation board can be cut to size and fitted between roof joists. Natural materials available in rigid board form include woodfibre and compressed hemp fibre.
* Thermal bridging
Flat roofed extensions are often built to accommodate new or enlarged kitchens or bathrooms. The trouble is, the humid air generated by activities such as cooking and bathing will be prone to condensing if it encounters cold surfaces, causing dampness.
The most common ‘cold bridge’ is found where roof joists form a direct link between the cold outside deck and the ceilings to the rooms below. So thermal bridging tends to be more of an issue on older style ‘cold roofs’ where the insulation (if any) is placed above the ceiling, similarly to a traditional loft.
Modern ‘warm roofs’ where the insulation boards are placed on top – on the outside – are technically better because the roof structure is encased by the insulation and can’t transmit cold from outside (although the relatively exposed end joists may still need insulating).
* Installing insulation
To achieve the target U-value of 0.18Wm2K or better, a 100mm depth of polyurethane boarding laid on top of the deck should be sufficient. But of course performance depends on the specific type of material that you use, and insulation manufacturers can advise on recommended depths. Just as important is where you decide to put the insulation. There are several options:-
1/ Above the decking (‘warm deck’ )
Laying thick high performance insulation boards on top of the existing deck should transform it into a snug new ‘warm roof’. In most cases this is the best option, the main constraint being whether raising the height of the roof by up to 150mm is likely to present any problems. For example if there’s a very low window on an adjacent wall, it could make the detailing tricky (e.g. at upstands tucked into mortar joints). The guttering and fascias are also are likely to need modification.
Warm roofs are have the advantage of being inherently immune to condensation, plus carrying out the work from above is considerably less messy and disruptive than taking down and replacing old ceilings from indoors. The downside is the difficulty of gaining access where roofs are more than one storey high, and the associated cost of scaffolding.
Once the old roof covering has been stripped, the condition of the deck must be checked. Old chipboard decks are especially prone to developing problems as they have poor water resistance. If the deck shows signs of rot or damage, it should be replaced with a new layer of plywood or OSB, and the insulation boards laid on top.
An ‘inverted roof’ is a modified version of a warm roof. But instead of stripping away the old covering it is left it in place, with the insulation simply placed on top. As long as it’s in sound condition, retaining the original waterproof covering below the new insulation can act as an additional level of defence. This method is often used with ‘walk-on’ flat roofs such as balconies.
2/ Below the ceiling (‘cold deck’)
Unless the roof covering needs replacing anyway, it may be simpler to tackle the job from indoors working from below, retaining the existing ‘cold deck’ arrangement. There are 2 main ways you can insulate from below:-
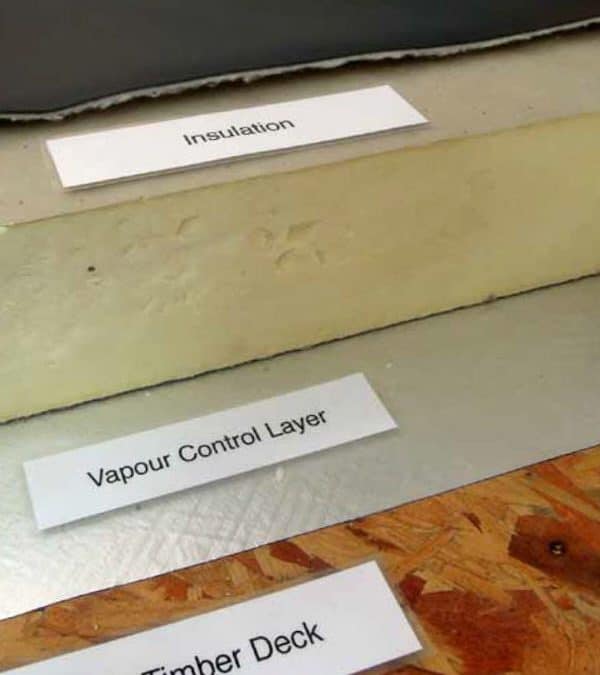
* Keep the existing ceiling in place and fix a new layer of thick rigid insulated plasterboard directly onto the existing ceiling. First apply a vapour control sheet so it’s sandwiched above the new layer to keep moisture at bay. A thickness of at least 50mm should be achievable.
* Again keeping the existing ceiling in place, a new suspended ceiling can be constructed underneath the old one – subject to available headroom. A new false ceiling can be built using fairly shallow joists (100mm x 50mm depending on the span). A gap of at least 50mm can be left so the new structure ‘floats’ independently of the old ceiling. The void can then be packed with mineral wool quilt. Again, a vapour control sheet should first be applied to prevent moist air getting into the structure.
3/ Above the ceiling (‘cold deck’)
It’s possible to do things the old fashioned way by ‘filling the void’ between the existing joists, as long as you leave a 50mm ventilation path on top of the insulation with air vents to the fascias. Maintaining an air flow is important to help disperse any humid air that gets in from the rooms below before it gets a chance to condense and make the roof and ceiling damp. So with typical 200mm deep joists you should be able to squeeze up to 150mm depth of insulation above the ceiling.
If you don’t mind the enormous amount of dust and mess access can be gained by tearing down and replacing the existing ceiling. Once the joists are exposed, thick rolls of wool or semi-rigid wool batts (or rigid boards cut to shape) can be placed between them, taking care to leave the necessary air gap on top. A new ceiling can then be installed with sheets of plasterboard fixed to the undersides of the joists over a vapour control sheet.
Alternatively, to save all the trouble and mess of taking down the ceiling, adding the insulation is often easier from above (where access is possible). But clearly this will require the temporary removal of the roof covering and deck – so this is a job that’s best combined with renewal works when the coverings need replacing anyway.
NEXT MONTH: Living in peace with suspended timber floors: how to banish cold draughts and stem hidden heat loss.
Ian Rock’s home insulation tips are taken from the new Haynes Home Insulation Manual. For further information see www.home-insulating.com