In this new series, Chartered Surveyor Ian Rock FRICS – Author of the Haynes Home insulation Manual – explains how to cut your energy bills by boosting your home’s thermal efficiency.
PART EIGHT:
Making The Most Of Your Roof Space
By Insulating Rafters
How to cut heat loss by insulating lofts at rafter level
Most lofts are insulated with thick rolls of loft quilt laid on top of the bedroom ceilings. See our previous Blog #7.
But this isn’t the only way to stem heat loss through your roof. Your property’s first line of defence against cold is the roof itself.
So insulating higher up along the roof slopes instead of down at ceiling level can potentially make the loft more useable, rather than just a cold and draughty wasteland.
But there are 2 major caveats:-
1/ To use your loft as living space requires a proper loft conversion – see The Haynes Loft Conversion Manual.
2/ Beware of misleading claims in adverts for spray foam ‘insulation‘. Spraying the undersides of your roof tiles with a thin layer of sticky polyurethane will NOT magically convert your loft into useable living space. It can also make you home unmortgageable significantly reducing its value as many mortgage lenders do accept homes where spray foam has been applied to roofs.
But there’s another reason why you might want to insulate your roof at rafter level. Some older houses were built with chilly attic rooms in the roof (traditionally used as servants’ quarters). These have uninsualted angled ceilings that follow the line of the lower roof slopes. Similarly, in houses with older loft conversions the rafters are likely to be woefully under-insulated by current standards. So the challenge is how best to upgrade the thermal performance at the level of the rafters/roof slopes.

* Choosing materials
To insulate roofs at rafter level it’s generally easier to fit rigid sheets of insulation (such as polyurethane or expanded polystyrene) rather than ‘floppy’ materials. Natural materials such as wood-fibre are also available in board form, and being vapour permeable these can be better suited for use in older houses.
However, rigid boards aren’t the only option. ‘Semi-rigid’ boards or mineral quilt ‘batts’ (or batts of mineral wool quilt sheep’s wool quilt or woodfibre) can also be very effective for insulating between the rafters and can be kept in place by lining underneath with insulated plasterboard. Shiny metallic multifoils are another option for lining the rafters on their insides.
* Where to insulate – above, between or below?
1/ Insulation on top
When building new roofs lining the outside so they’re insulated externally is the generally the most thermally efficient method. This is known as ‘warm roof’ construction because the roof structure and living space below are inside the insulated envelope and hence remain warm. But unless you’re planning to re-roof your house this isn’t usually realistic option, other than for some small lean-too roofs where a layer of insulation can be applied over the top of the rafters once stripped of tiles and battens. For air tightness, a vapour control sheet can first be laid on the inner side to prevent warm air getting into the structure and condensing.
With the insulation boards in place, timber battens are fixed down the line of each rafter to secure them in place. These ‘counterbattens’ are screwed through the insulation into the rafters beneath, forming a ventilated space. Conventional horizontal battens are then fixed over a breather membrane laid over the counterbattens. Finally the tiles are can be re-hung onto the new battens.
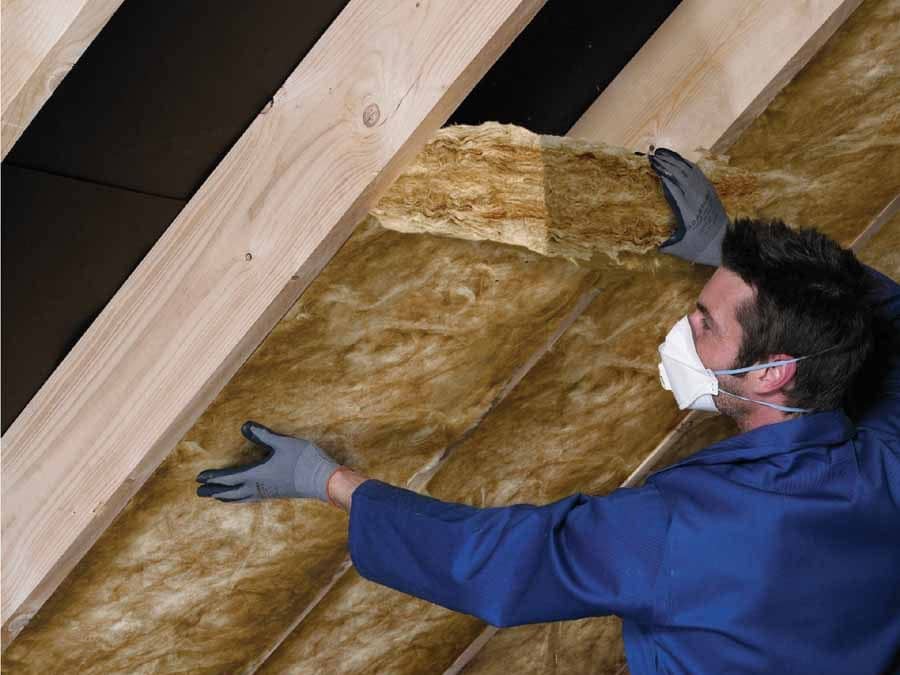
2/ Internal rafter insulation
In most cases insulating from inside the loft is a far more realistic option than lining the outside. This method has the advantage of being considerably cheaper and doesn’t change the appearance or dimensions of the existing roof. However it obviously involves a certain amount of disruption carrying materials through the house. It also requires accuracy to ensure there are no gaps in the home’s ‘thermal envelope’.
The first thing to bear in mind is that the Building Regulations normally require a 50mm deep ventilation path to be left between the rafters on the upper side. The amount of insulation you can stuff between the rafters obviously depends on their depth, so this reduces the amount of space left for fitting insulation. The depth of rafters varies but is typically around 100mm, so you may only have sufficient room to accommodate about 50mm thickness. Although this is a reasonable depth, ideally you’d want to be a bit more ambitious and aim for 70mm or 100mm of insulation. One way to achieve this is solution is by ‘doubling up’ the existing rafters fitting new deeper ones screwed in place alongside, say 150mm deep.
The insulation boards can then be cut to shape. But before wedging them between the rafters, thin lengths of timber batten should be fixed along the sides of the rafters to form a guide rail or lip for the boards to sit on, allowing for a clear 50mm air space on the outer side. This helps secure the boards in place so they can’t later slip and block the air void. Once fitted, any gaps in the insulation should be sealed with expanding foam. Alternatively batts of wool quilt can be squashed between the rafters and secured with a lining of insulated plasterboard – see below.
3/ Below the rafters
To meet the target U-value of 0.18 W/m2K normally means you need to combine insulating between the rafters with a second layer lining the undersides. The simplest way to do this is by fixing rigid insulation boards under the rafters (about 80 – 100mm thick). Using insulated plasterboard combines two jobs in one. With the foil-backed variety, the foil provides a vapour barrier. Alternatively, polythene sheet vapour check membrane should be draped across the underside of the rafters prior to fitting insulated plasterboard. All joints must be taped, and any gaps in the insulation sealed with expanding foam.
4/ Internal ceiling insulation
In houses with attic rooms, or where the loft has been converted, adding an extra lining of insulated plasterboard over the existing surface is generally the simplest (and least messy) option – subject to a small loss of headroom. In period properties, old lathe & plaster ceilings are much thicker than modern plasterboard and have better sound and thermal insulation qualities, so it makes sense to preserve them. So rather than replacing the existing ceiling, a fresh insulated lining should be applied over the old plasterwork. However extra-long dry-wall screws will be needed to firmly secure it. To achieve sufficient grip these will need to extend through the new insulation and existing plasterwork into the timber rafters behind.
Eaves cupboards
Whichever method of insulating (or combination of methods) you choose, to save having to insulate the lower roof slopes, short ‘purlin walls’ can be constructed in 100mm thick timber studwork.
These create a useful eaves cupboard space to the sides of the loft. But because these cupboard spaces will be open to the outside air they can be very cold. This is because they form part of the roof ventilation path (usually leading up from vents in the eaves, flowing up behind the rafters, under the ridge and down the other side to the eaves on the opposite side).
So it’s important that these stud walls – and cupboard doors – are fully insulated. This can be done similarly to the roof, by first insulating between the studwork and then adding a second layer lining the inner face to the loft.
Older Houses
Finally, bear in mind that with older properties it’s always a good idea to consult an expert in historic buildings.
NEXT MONTH: Flat roofs: how to make them warm and dry, and save money in the process.
Ian Rock’s home insulation tips are taken from the new Haynes Home Insulation Manual. For further information see www.home-insulating.com